Mildred the Gnome’s Guide to Seed Starting in the Pacific Northwest
Tea with Mildred Witherspoon: A Proper Chat About Cut Flowers
Feb. 23, 2026
Mildred Witherspoon adjusts her gloves, surveys the seed packets, and sighs dramatically. “People act as though seeds are fragile little wishes,” she says. “They are not. They are instructions. You just have to read them.”
Mildred adores cut flowers, roses, dahlias, peonies, but she is particularly fond of the flowers that reward a gardener generously and for a long season. And yes, many of them are delightfully easy from seed.
Let’s talk about four of her favorites.
Sweet Peas (Lathyrus odoratus)
Mildred’s favorite for fragrance and romance. She says that they smell like hope and nostalgia.
Start indoors or outdoors?
- Indoors: 6–8 weeks before last frost
- Outdoors: As soon as the soil can be worked (they like cool weather)
How to grow from seed:
- Soak seeds overnight before planting
- Plant ½–1 inch deep
- Provide support early (trellis, twine, or a hopeful fence)
Cut flower tips:
- Cut often (daily if possible)
- The more you cut, the more they bloom
- Harvest when 2–3 flowers are open on the stem
Give them a pinch:
When the sweet pea is about six inches tall, use your fingernails to remove the main, central tip. This encourages them to grow bushier and fuller. You can also pinch a fully grown pea to remove a single vine and encourage branched growth. Give it a pinch!
Bloom season: Late spring to early summer
Current seeding plans: Old Spice Mix by Territorial Seed Company and Chocolate Sweet Peas by Chocolate Flower Farm in Langley, Washington.
Peonies (Perennial)
Mildred grows quiet here. Peonies demand respect. “You grow peonies for the future,” she says. “And for whoever inherits your garden.”
Start indoors or outdoors?
- Best planted: Fall from bare root plants
Reality check (Mildred insists on honesty):
- Peonies grown from seed can take 3–5 years to bloom
- Most gardeners plant bare roots instead
Cut flower tips:
- Harvest at the “marshmallow stage” (soft bud, just beginning to open)
- Strip lower leaves
- Store buds in the fridge wrapped in paper for later use
Bloom season: Late spring to early summer (short but spectacular)
Cosmos
Mildred calls these “the flower for people who overthink.” “They grow whether you fret or not, so they are great for nervous gardeners.”
Start indoors or outdoors?
- Indoors: 4–6 weeks before last frost
- Outdoors: After danger of frost has passed
How to grow from seed:
- Barely cover seeds with soil
- Do not over-fertilize (they bloom better when slightly neglected)
Cut flower tips:
- Cut when flowers are just opening
- Long, airy stems are perfect for loose bouquets
- Regular cutting prevents legginess
Bloom season: Early summer until frost
Current Planting Plan: Chocolate Cosmos ‘CFF’ Chocolat by Chocolate Flower Farm (smells like chocolate), Double Click Mix by Territorial Seed Company
Zinnias
Mildred’s workhorse cut flower.
“If you want abundance,” she says, “you plant zinnias and stop arguing with yourself.”
Start indoors or outdoors?
- Indoors: 3–4 weeks before last frost
- Outdoors: After soil has warmed and frost risk is gone
How to grow from seed:
- Plant ¼ inch deep
- Loves heat and sun
- Good airflow prevents mildew
Cut flower tips:
- Perform the “wiggle test” – if the stem flops, it’s not ready
- Cut above a leaf node for branching
- Excellent vase life (7–10 days)
Current Planting Plan: Queen Red Lime, Art Deco mix from Territorial Seed Company
“Growing from seed isn’t difficult,” she says. “It’s just slower. And sometimes slower is exactly what we need.”
If you want:
- Fragrance: Sweet peas
- Legacy: Peonies
- Ease: Cosmos
- Abundance: Zinnias
You don’t need a greenhouse, a degree, or perfect timing, just soil, light, water, and a willingness to try.
Other things to plant: Snapdragons (Black Prince), Calendula (Strawberry blonde), Marigold (Durango Red), Nasturtium (Black velvet)
Gerald’s Grumbles from the Potting Bench: On the Noble Art of Seed Starting (and the Tragedy of Carrots in Trays)
By Gerald, Senior Garden Gnome, Seed Supervisor, Mildly Irritated Observer of Human Choices
Ah yes. That time of year. The brave (or foolhardy) among you begin rooting through seed packets like raccoons in a pantry. Envelopes are sorted, and labels are acquired. Dirt finds its way under fingernails, onto foreheads, and somehow, somehow, into mugs of tea.
I approve. Mostly.
Seed starting, when done properly, is one of the great quiet joys of gardening. When done improperly, it is a comedy of errors that I, Gerald the Gnome, am forced to witness from my post near the potting bench.
Let us begin with what you actually need, because despite what the internet would have you believe, seed starting does not require a second mortgage.
The Basics (Even I Can Agree With This List)
You need:
- A basic seed tray (or pots, or yogurt cups with holes, or toilet paper rolls, don’t tell Mildred)
- Seed-starting soil (not garden dirt, unless you enjoy fungus and regret)
- Seeds (this seems obvious, yet here we are). Do not buy on Amazon — find a good local vendor. The Gardener loves Seattle Seed Company and Territorial Seed
- Warmth (a warm room or seed-starting heat mats)
- Light (grow lights, not a sunny window that lies to you)
That part? Easy. Almost suspiciously easy. Where humans falter is in the after.
The Part No One Warns You About
You must be prepared to keep these seedlings alive until they can safely go outside. That means:
- Potting them up when they outgrow their trays
- Watering without drowning
- Feeding without burning
- And, this is critical, waiting until the weather stops lying. Do not fall for false spring.
Seedlings are like toddlers. They need structure, snacks, naps, and protection from sudden cold snaps.
And for the love of compost, know this:
Some things need to be started outside.
Carrots, for example.
I once saw The Gardener attempt to transplant carrots she’d started in seed trays. The roots looked like startled octopuses. What followed was a vocabulary lesson I will never unhear. Mildred still sighs when she thinks about it.
So remember:
- Carrots, radishes, beets, squash → direct sow
- Peas, beans → usually happier outside
- Tomatoes, peppers, flowers → enjoy the indoor spa treatment
The One Thing Mildred and I Agree On
There comes a day every year.
A dark, fishy day.
It is the day The Gardener brings home her favorite seed-starting fertilizer: fish fertilizer. Neptune’s Harvest, to be exact.
Now, I am a gnome of the soil. I understand that good things smell bad. But this, this makes the entire greenhouse reek like Poseidon’s forgotten lunch. You can smell it outside. The Builder can smell it while hauling his camping equipment to and from the shed. He hates the fish fertilizer with the passion of a thousand suns. He walks past muttering, arms full of tents and tarps, as if preparing to flee civilization entirely.
So What Are the Best Seed-Starting Fertilizers?
Since you asked, and since I refuse to suffer without sharing wisdom, here are the best options for seedlings:
1. Fish Emulsion (like Neptune’s Harvest)
- Excellent for leafy growth
- Gentle enough when diluted properly
- Smells like regret and low tide
- Use at ¼ strength for seedlings
2. Liquid Seaweed (Kelp)
- Encourages strong roots and resilience
- Doesn’t smell quite as bad (still smells, though)
- Great as a supplement, not a sole fertilizer
3. Balanced Organic Liquid Fertilizers (e.g., 2-2-2 or 3-1-2)
- Designed for young plants
- Often labeled “seedling-safe”
- Less olfactory violence
4. Compost Tea (Very Mild)
- Only if you know what you’re doing
- Weak tea, not sludge
- Think “sip,” not “meal”
How to Apply Without Ruining Everything
- Wait until seedlings have true leaves (not just the first baby ones)
- Dilute more than the label says (humans are heavy-handed)
- Apply every 1–2 weeks, not daily
- Water first if the soil is dry, never fertilize thirsty roots
Remember: seedlings want encouragement, not a full banquet.
In Conclusion (Before I Knock Over a Tray)
Seed starting is not about perfection. It’s about timing, patience, and knowing when to leave well enough alone. Get the basics right and respect which plants want to begin their lives in the outdoors. You must feed gently and accept the smell of fish as a sign of progress.
And if you ever feel tempted to transplant carrots, think of me, Gerald, shaking my tiny stone head in disappointment. Now, if you’ll excuse me, Mildred says the lights need adjusting, and I believe The Builder has opened every window in the greenhouse again.
Honestly. The man has no appreciation for nitrogen.
What the gardener is about to start for her PNW greenhouse in the next two weeks:
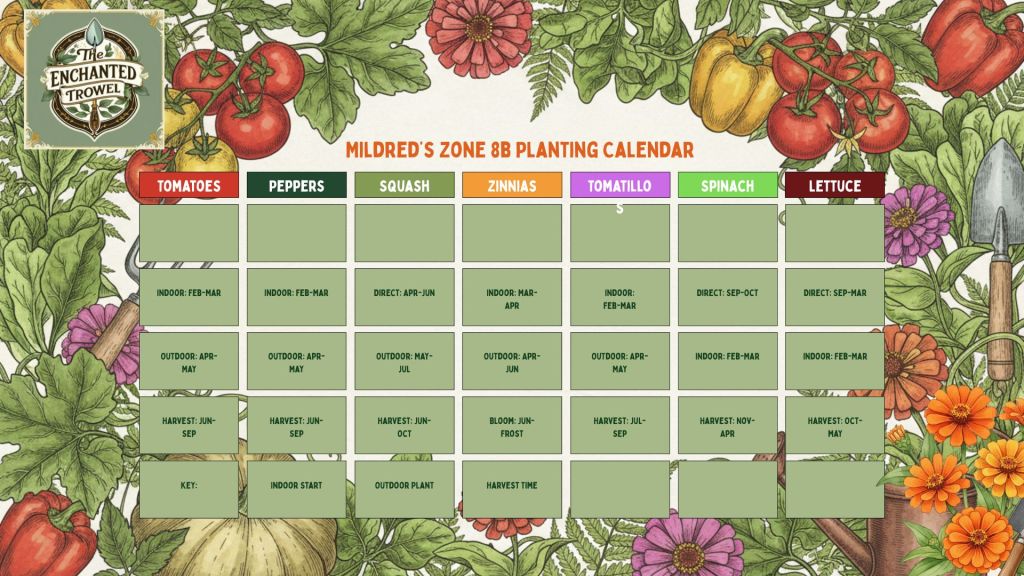
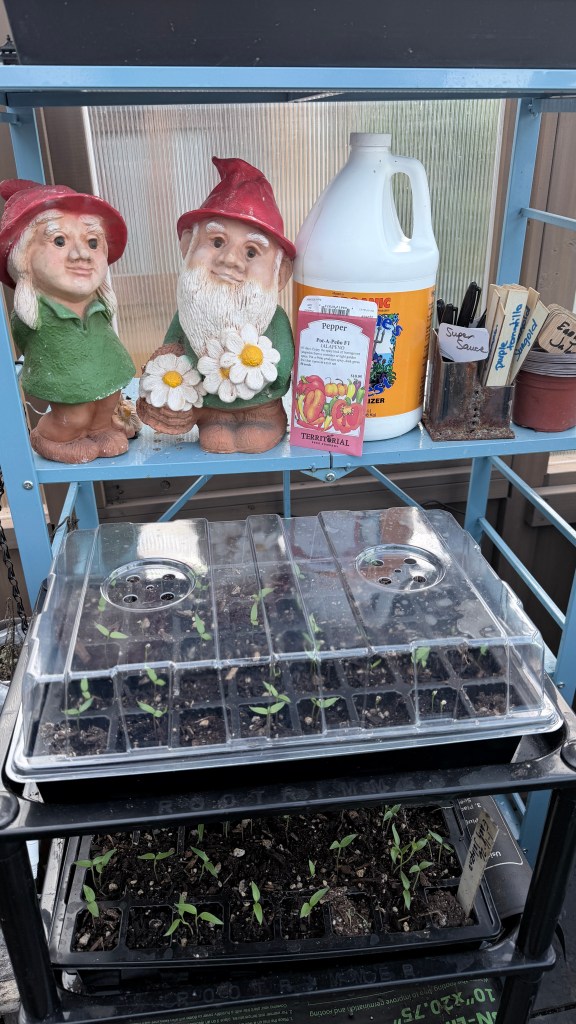
Tomatoes (San Marzano and Sungold), Tomatillos, Early Jalapenos, and Pot-a-peno (new this year)
A February Lecture on the Proper Mutilation of Roses
As delivered (unsolicited) by Gerald Witherspoon, Garden Gnome of Long Experience
I do not enjoy February because it is damp, gray, and my hat smells faintly of moss and unmet expectations. Yet, this is when the roses must be pruned.
You may imagine pruning to be a cheerful snip-snip affair undertaken by optimists in linen aprons. It is not. It is a bracing, mud-splattered act of faith performed between rain squalls in the Pacific Northwest while muttering about black spot.
Here in the PNW (Zone 8ish, give or take a microclimate and a dramatic windstorm), we prune roses around President’s Day, ideally:
- After the harshest freezes
- Before strong new growth elongates
- On a dry-ish day, if such a myth presents itself
If you see buds beginning to swell, little reddish nubs along the canes, that is your cue. The roses are stirring. Best to tidy them before they leap into another year of production.
Before you approach a rose:
- Use sharp bypass pruners (not the dreadful anvil sort that crushes). If you are The Gardener, this means going outside and figuring out where you left them last fall and cleaning off the rust.
- Loppers for thick canes. The Gardener also got electric pruners from The Builder for Christmas, and she loves them.
- Gloves thick and long enough to discourage regret.
- Rubbing alcohol to wipe blades between plants, especially if black spot or powdery mildew was a problem last year.
Step One: Remove the Dead, the Dying, and the Dramatic
In February, every rose, hybrid tea, floribunda, shrub, climbing gets the same first treatment:
- Remove all dead wood.
Dead canes are brown, brittle, and hollow or gray inside. Cut back to healthy green pith. - Remove diseased or damaged wood.
Anything blackened, shriveled, or suspicious. - Clear fallen leaves from the base.
Especially if black spot was present as those spores overwinter like uninvited relatives. - Strip remaining diseased leaves from canes.
Hard Prune vs. Light Prune (Choose Your Courage)
This is where gardeners lose their nerve.
The Hard Prune (For Bold Souls and Strong Roses)
Best for:
- Hybrid teas
- Floribundas
- Grandifloras
- Roses that performed poorly last year
- Older shrubs needing rejuvenation
In a hard prune, you:
- Cut canes back to 12–18 inches tall
- Remove all but 3–5 strong, healthy canes
- Cut just above an outward-facing bud
- Aim for an open, vase-like shape (air circulation is everything in our damp climate)
Hard pruning results in:
- Fewer but larger blooms
- Stronger, more vigorous spring growth
- A rose that behaves as though it has attended finishing school
It looks brutal, but it is for the greater good – so utilitarian in nature.
The Light Prune (For Shrubs, Climbers, and the Faint of Heart)
Best for:
- Established shrub roses
- English roses
- Climbing roses (mostly shaping, not hacking)
- Roses you wish to keep large
In a light prune, you:
- Remove dead/damaged wood
- Shorten canes by about one-third
- Shape gently
- Preserve the overall structure
For climbers:
- Do not cut all canes short.
- Keep main canes (the long structural ones).
- Remove weak side shoots and shorten laterals to 2–3 buds.
- Tie the main canes horizontally if possible; this encourages more blooms along the cane.
Step Two: Shape and Thin
After the big cuts:
- Remove crossing canes (choose the stronger one).
- Remove spindly growth thinner than a pencil.
- Aim for 3–5 strong, evenly spaced canes.
Think structure. Think airflow. Think: Would a frog butler approve of this geometry?
“I do prefer symmetry,” Mr. Carson admits.
Step Three: Clean the Base
In the Pacific Northwest, disease management begins in February:
- Rake out all old leaves.
- Remove mulch that may harbor spores.
- Replace with fresh compost or clean mulch after pruning.
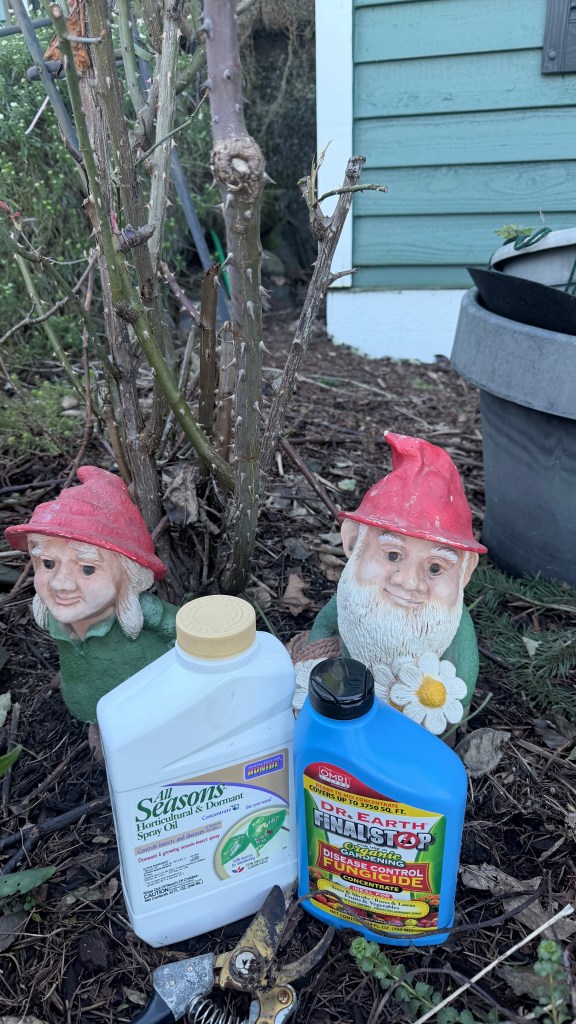
- Consider a dormant spray (lime sulfur or copper) applied on a dry day before leaves emerge.
:Prevention,” says Mr. Carson, “is the height of refinement.” The Gardener did this just yesterday – a nice copper fungicide combined with a dormant spray.
This is a bit of a controversial thought, but fertilizer isn’t needed right now.
A Note on Fear
Most gardeners are afraid to cut too much.
But roses, particularly hybrid teas and floribundas, want decisive pruning. In our mild winters and long, damp springs, they will rebound vigorously.
“If you prune lightly out of fear,” I say, “you get lanky canes, small blooms, and regret.”
The Deeper Matter (Which I Reluctantly Admit)
February pruning looks severe. The garden appears reduced. Exposed. Honest. Remember that this is preparation. You remove what is dead so the energy can be sent into what is living.
Mr. Carson folds his stone hands. “Pruning is not destruction. It is direction.”
Mildred smiles at the newly opened rose bush. “It is trust.”
I inspect the final cut, angled cleanly above an outward bud.
“It is,” I concede, “a necessary intervention against chaos.”
The rain begins again. Of course it does. But beneath the gray sky, the roses stand trimmed, structured, ready.
Jan. 22nd, 2026
Featuring purple alien lights, tea breaks, and a little dirt under the nails
Well, hello there, dirt-loving friends. Mildred the Gnome here, resident garden supervisor, seed whisperer, and part-time garage dweller. Pull up a mossy stool and let me tell you about one of my favorite PNW rituals: seed starting season.
Last year, the Gardener bought me a new grow light for the garage. It is… how do I put this delicately… purple. Not a gentle lavender. Not a polite violet. No. This thing makes the whole house glow like aliens are landing in Washington. The neighbors probably assume we’re communicating with outer space. 👽
But listen, the results? Magnificent. Sturdy stems. Happy leaves. No leggy drama queens. So, despite having two greenhouses, I will once again be stationed in the garage this year, sipping imaginary tea and supervising seedlings like the professional gnome I am.
Now, for many folks, seed starting feels mysterious. Like only gardeners with special powers and matching overalls can do it. But the truth?
It’s simple.
It’s forgiving.
And it opens up a whole universe of plants you’ll never find at the big box store.
When you buy from the hardware store, you’re getting the tough, generic kids, the ones that behave anywhere. Fine, respectable plants. But not always the ones best suited for your Pacific Northwest microclimate.
When you start from seed, though?
You get to choose heirlooms, weirdos, flavor bombs, and local favorites that actually like our cool nights and moody springs. Plus, you control the timing, the soil, and the love.
Easy peasy, as I say while tripping over a watering can.
Mildred’s Very Scientific Seed-Starting Method
First, I do what any organized gnome does:
I don’t plan much at all.
Instead, I grab a cup of tea (or two), plop myself at the kitchen table, and flip through my favorite PNW seed catalogs and websites:
- Territorial Seed
- Seattle Seed Company
- And occasionally a little side quest to other places if something is missing (I adore the cupcake squash from Burpee (don’t tell Gerald).
There are lots of circles. Lots of dreaming. Tabbed pages, notes in the margins. Some whispering to tomatoes about their future.
Then comes the important part: reality.
How much space do I actually have?
Will these babies live in trays for weeks?
Do they need potting up once or twice before heading outdoors?
In the Pacific Northwest, timing matters. For tender things like tomatoes and peppers, Mother’s Day is usually the earliest safe bet, and that assumes we aren’t stuck in a cold, soggy spring (which we often are, because… PNW).
Seeds started too early need a cozy place to grow inside without turning into spindly noodles.
The Purple Garage of Destiny
Right now, I use a five-shelf system with grow lights in the garage. The purple glow makes it feel like a disco for plants. If Gerald doesn’t object, I’ll add more shelves as seed season ramps up in late February and March.
I always start with the varieties that take the longest:
- Jalapeños
- San Marzano tomatoes
- Violas
- Other slowpokes who like a head start
They sit under the lights, dreaming of summer while rain taps politely on the roof.
Mildred’s Best Steps for Seed Starting in the PNW
Here you go – Gnome-approved and gardener-tested:
- Choose PNW-friendly seeds.
Look for varieties that like cool nights and shorter summers. - Know your dates.
Most tender plants go outside around Mother’s Day - Use good seed-starting mix.
Not heavy garden soil. Seeds want light, fluffy bedding like tiny plant mattresses. - Give them light immediately.
No window guessing games. Grow lights close to the plants prevent legginess. Seed warming mats help since they live in the very, very cold garage and I haven’t figure out how to knit seedling sweaters. - Water gently.
Moist, not soggy. Seeds hate swimming lessons. - Pot up when needed.
If roots fill their space before planting out, move them into bigger homes. - Harden off before outdoors.
Let them meet the real world slowly with a little outside time each day. - Don’t overthink it.
Plants want to grow. Your job is mostly to not get in the way.
Mildred’s favorites:
Cucamelon (Mexican Gherkin), Cupcake Squash, Sungold (cherry tomatoes), Spartan carving pumpkin, Double Click Cosmos, Purple Tomatillos, Whirligig Zinnias & Sweet Peas
Always add some pollinator-friendly plants like Borage and Lady Phacelia. The bees and the plants will be forever grateful.
Jan 9th, 2026

Mildred’s #1 Tip for January: When planning the amount of spring seeds to plant, remember that you are a gardener, not a farmer.
January Gardening Tasks in the Pacific Northwest
1. Observe Before You Act
This is the month to notice. Watch where water pools, where frost lingers longest, and which plants shrug off the cold. These observations will guide spring changes far better than any garden plan drawn indoors.
2. Tidy (Lightly)
- Remove fallen, soggy leaves from lawns and paths to prevent rot and slipping.
- Leave seed heads, stems, and leaf litter in beds where possible, as they shelter beneficial insects and birds.
- Cut back only what is clearly dead or diseased.
3. Pruning (Weather Permitting)
- Prune fruit trees (apples, pears) and dormant deciduous trees on dry days.
- Remove crossing or damaged branches.
- Avoid pruning spring-flowering shrubs
4. Care for the Soil
- Stay off saturated soil to avoid compaction.
- Add compost to beds if the ground isn’t frozen; winter rains help work it in naturally.
- Mulch around perennials to protect roots from freeze and thaw cycles
5. Check Drainage – January rain reveals everything
- Clear clogged drains, swales, and gutters.
- Consider rain gardens, French drains, or relocating plants that hate wet feet.
6. Protect From Cold Snaps
- Keep frost cloth or burlap handy for sudden freezes.
- Check that tender plants are insulated, and pots are elevated off cold ground.
7. Indoor & Covered Tasks
- Clean and sharpen tools.
- Wash pots and seed trays.
- Take inventory of seeds and start ordering
- Start slow-growing seeds indoors late in the month (leeks, onions, celery).
8. Feed the Wildlife
- Keep bird feeders clean and stocked.
- Provide fresh water
Your garden allies are watching and waiting.
9. Dream a Little
January is for garden notebooks, wish lists, and sticky notes on seed catalogs. Let ideas wander. The garden will tell you when it’s time to act.
